代码游戏
入门
蠕虫的操作
您的 Spawn 会通过 spawnCreep 方法创建名为 "蠕虫 "的新单位。该方法的用法在文档中有所描述。每个 "蠕虫 "都有一个名字和特定的身体部位,这些部位会赋予 "蠕虫 "各种技能。
您可以通过以下方式用 Spawn 的名称来称呼它: Game.spawns['Spawn1'].
创建一个蠕虫工作者,使用体数组 [WORK,CARRY,MOVE],并命名为 Harvester1(这个名字对教程很重要!)。您可以自己在控制台中键入代码,也可以复制并粘贴下面的提示。
Game.spawns['Spawn1'].spawnCreep( [WORK, CARRY, MOVE], 'Harvester1' );太好了 现在你可以控制一个名为 "Harvester1 "的蠕虫了。
通过 "查看 "操作,您可以看到爬行(或其他对象)的所有特征。
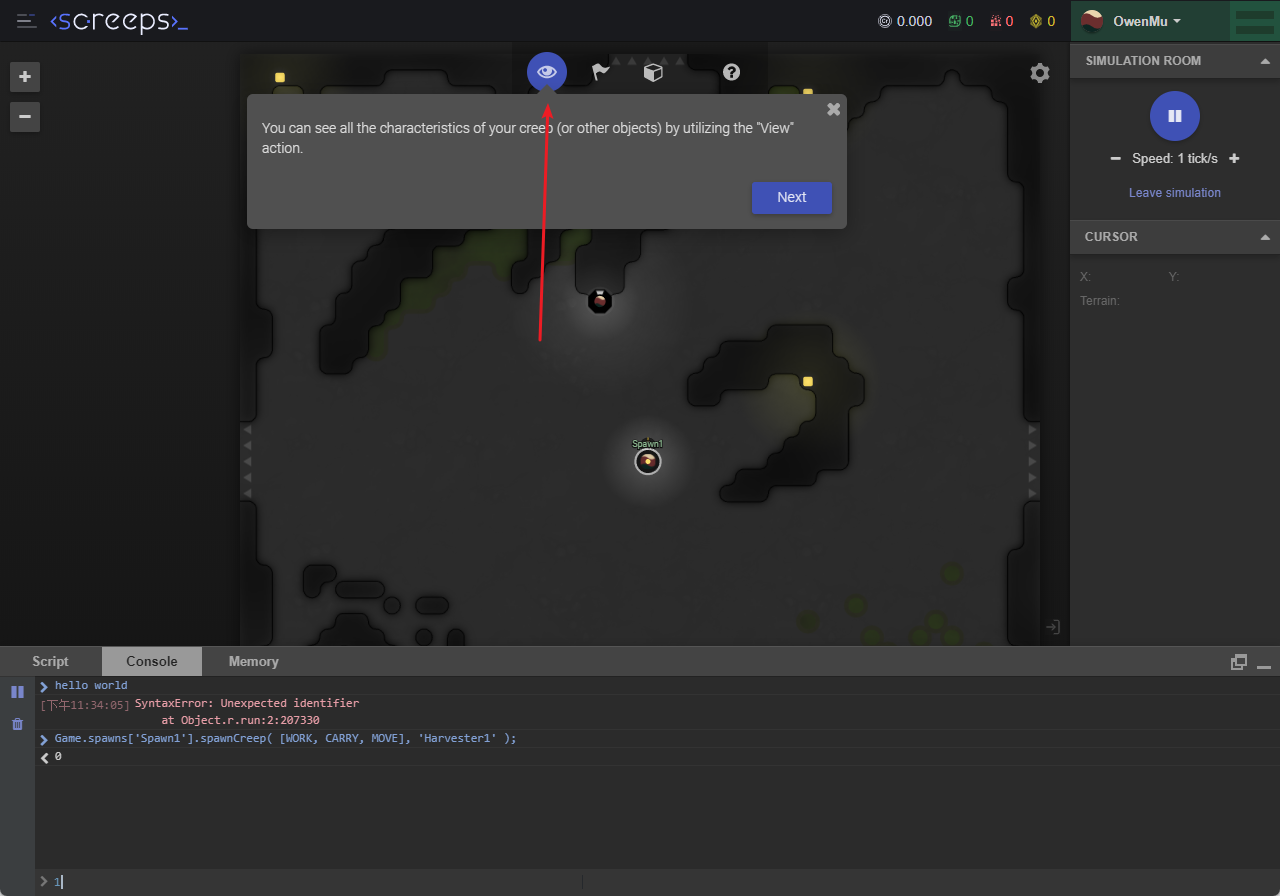
使用 Alt+Enter 隐藏编辑器面板,然后使用 "查看 "操作选择蠕变。
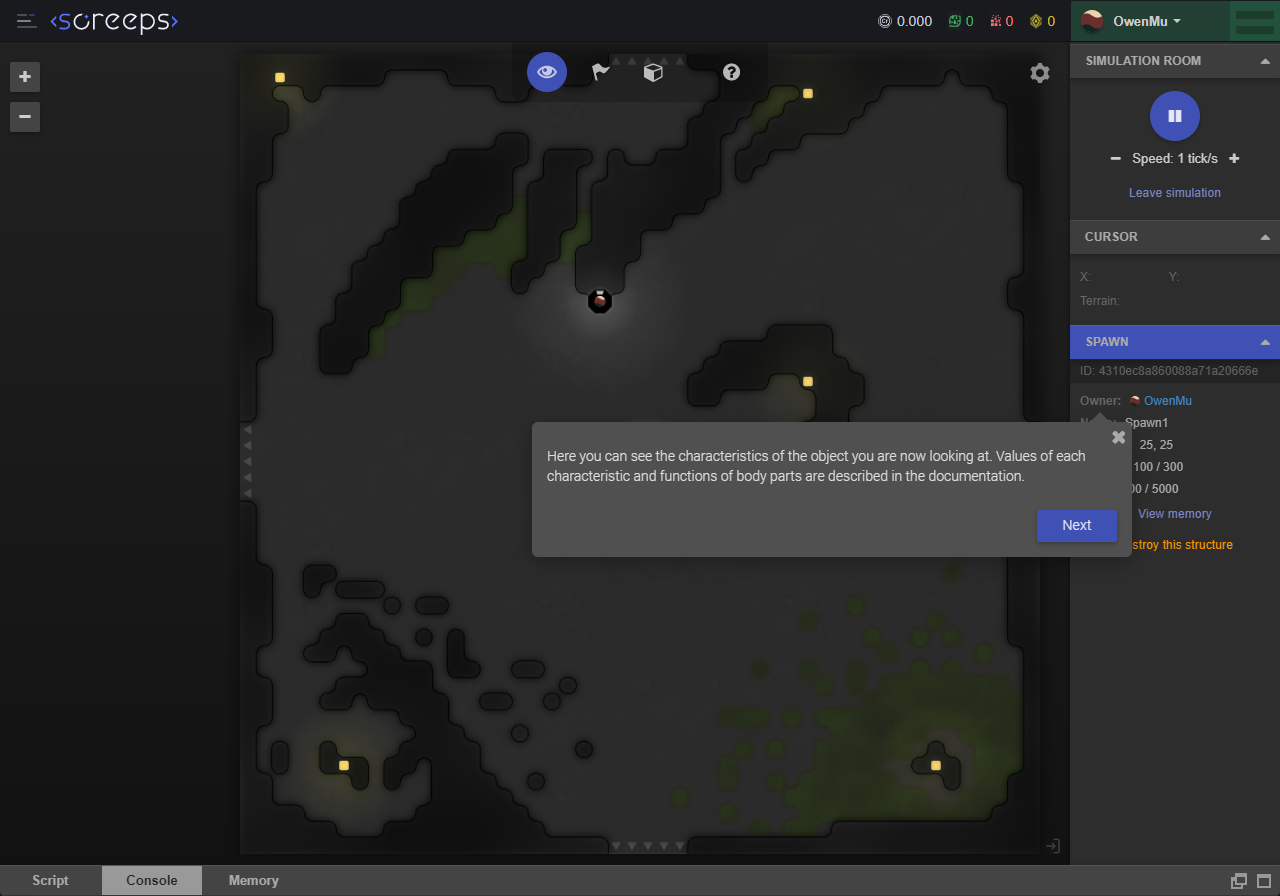
在这里,您可以看到您正在查看的对象的特征。每个特征的值和身体各部分的功能都在文档中有所描述。
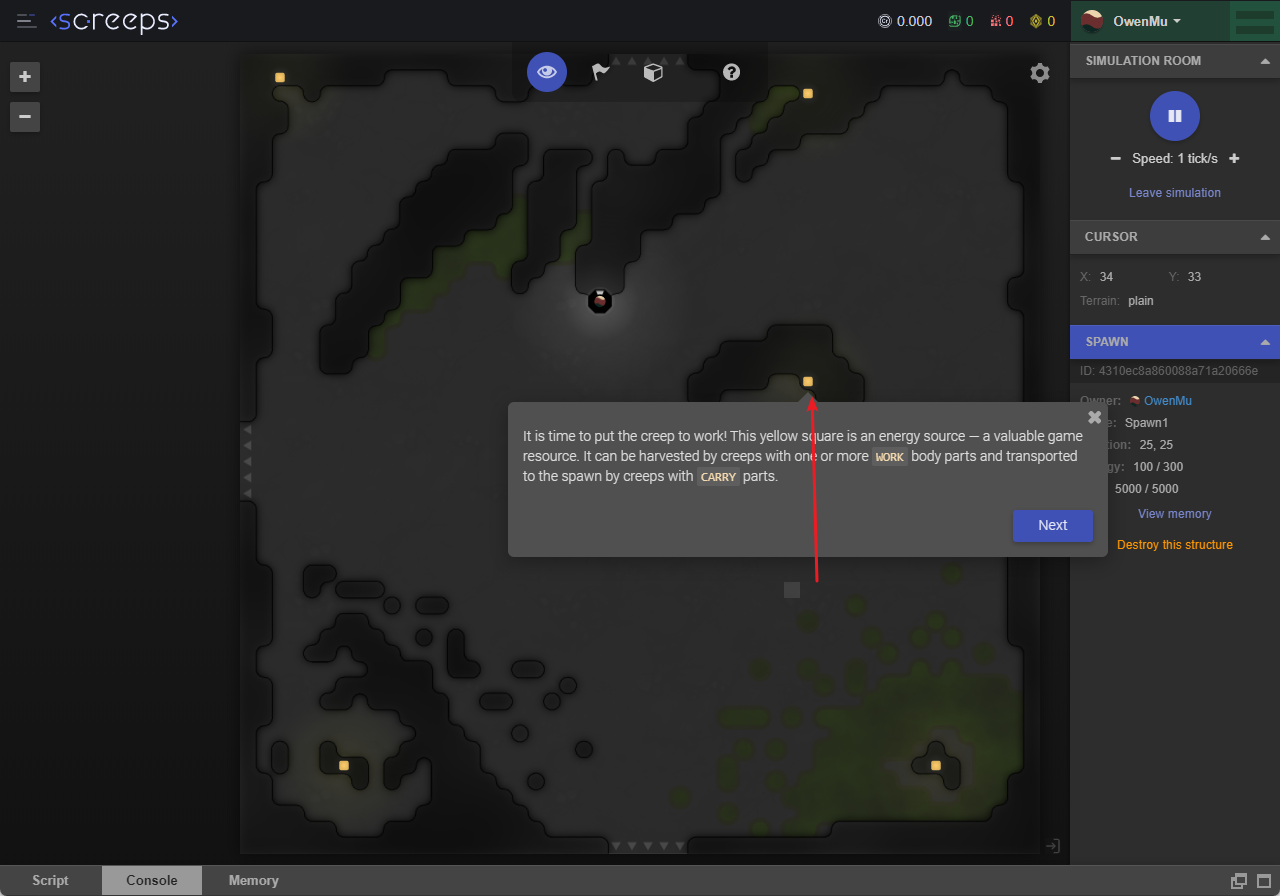
是时候让蠕虫开始工作了!这个黄色方块是一种能量源--一种宝贵的游戏资源。拥有一个或多个 "工作 "身体部位的蠕虫可以采集它,拥有 "搬运 "身体部位的蠕虫可以将它运送到产卵点。
To give your creep a permanently working command, the console is not enough, since we want the creep to work all the time. So we'll be using the Script tab rather than the console.
要让你的蠕变指令永久有效,光靠控制台是不够的,因为我们希望蠕变指令一直有效。因此,我们将使用脚本选项卡而不是控制台。
Click the "Script" tab.
点击 Script 页签
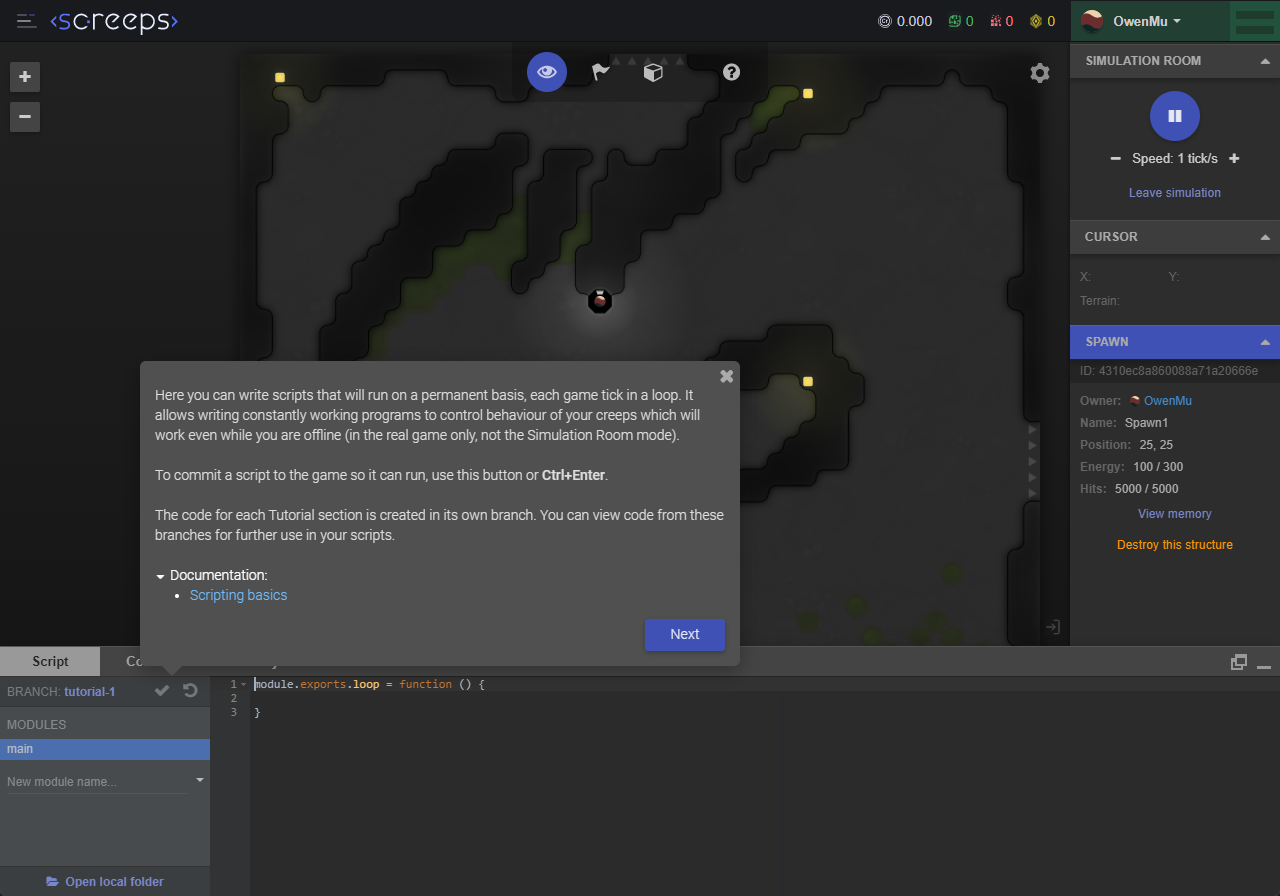
Here you can write scripts that will run on a permanent basis, each game tick in a loop. It allows writing constantly working programs to control behaviour of your creeps which will work even while you are offline (in the real game only, not the Simulation Room mode).
To commit a script to the game so it can run, use this button or Ctrl+Enter.
The code for each Tutorial section is created in its own branch. You can view code from these branches for further use in your scripts.
在这里,您可以编写永久运行的脚本,每个游戏 tick 都会循环运行。它允许编写持续运行的程序来控制小兵的行为,这些程序即使在您离线时也能运行(仅限真实游戏,不包括模拟室模式)。
要将脚本提交到游戏中使其运行,请使用此按钮或按 Ctrl+Enter 键。
每个教程部分的代码都创建在自己的分支中。您可以查看这些分支中的代码,以便在脚本中进一步使用。
To send a creep to harvest energy, you need to use the methods described in the documentation section below. Commands will be passed each game tick. The harvest method requires that the energy source is adjacent to the creep.
You give orders to a creep by its name this way: Game.creeps['Harvester1']. Use the FIND_SOURCES constant as an argument to the Room.find method.
Send your creep to harvest energy by typing code in the "Script" tab.
要发送蠕变指令以获取能量,您需要使用下面文档部分描述的方法。每次游戏结束时都会传递命令。采集方法要求能源与爬行者相邻。
您可以通过蠕虫的名称向其下达指令: Game.creeps['Harvester1']. 使用 FIND_SOURCES 常量作为 Room.find 方法的参数。
在 "脚本 "选项卡中输入代码,让您的蠕虫收获能量 。
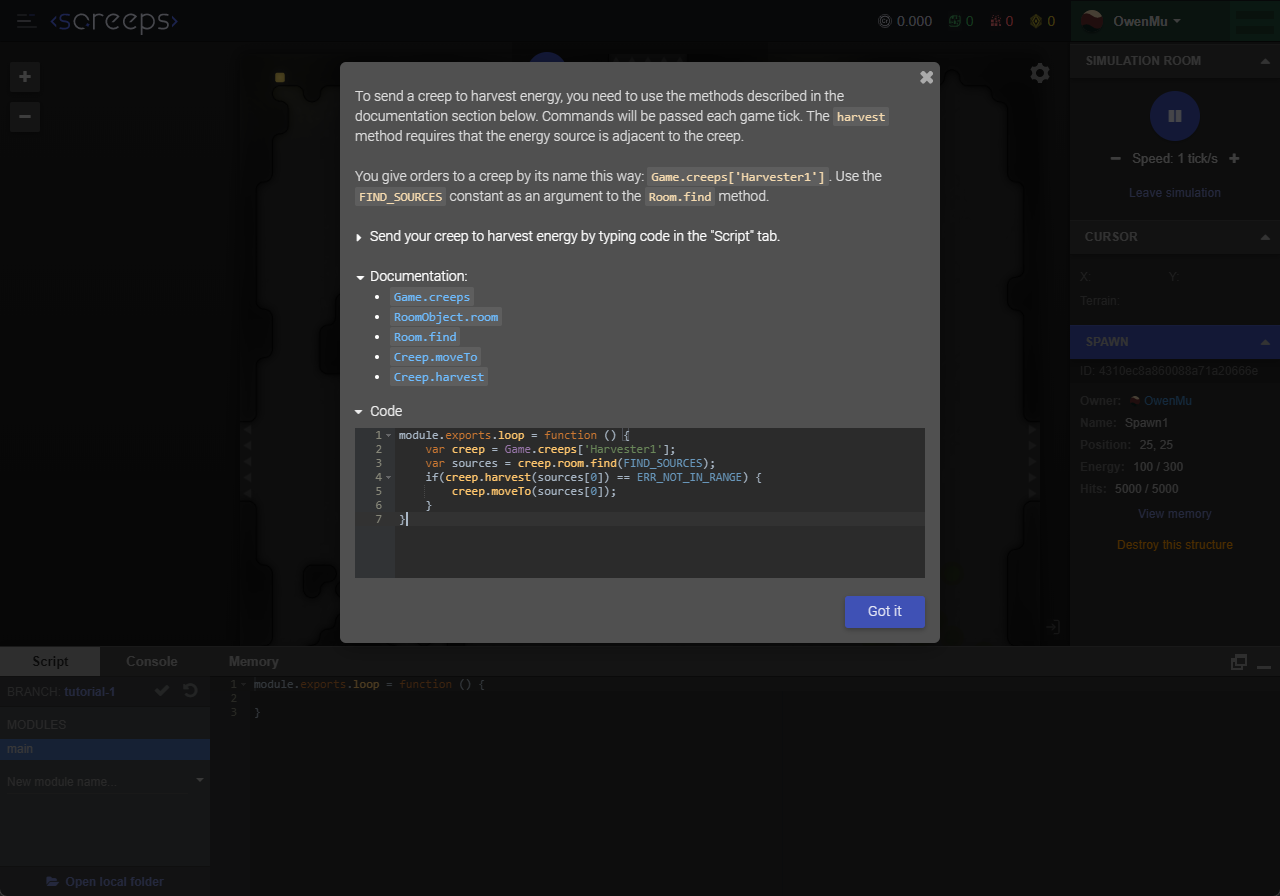
module.exports.loop = function () {
var creep = Game.creeps['Harvester1'];
var sources = creep.room.find(FIND_SOURCES);
if(creep.harvest(sources[0]) == ERR_NOT_IN_RANGE) {
creep.moveTo(sources[0]);
}
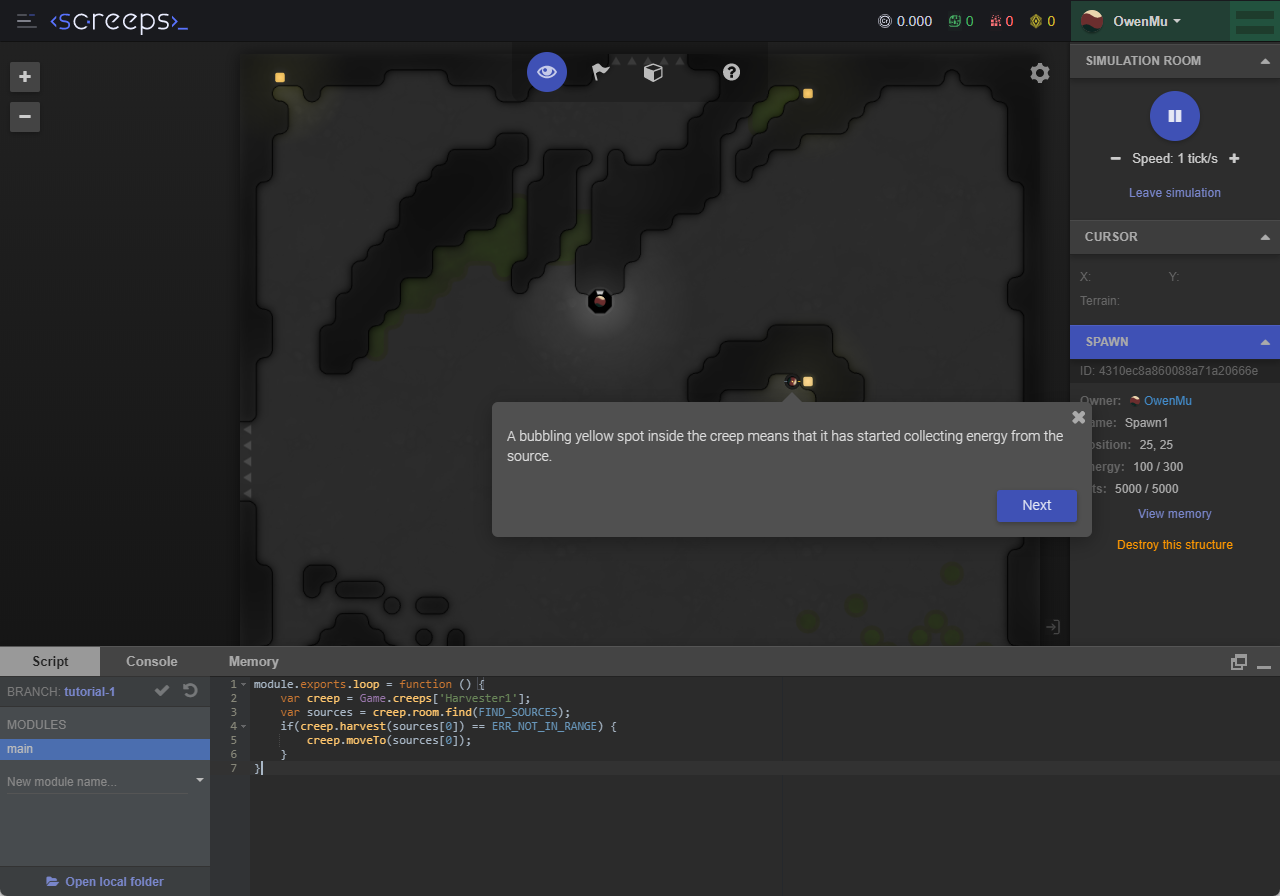
}A bubbling yellow spot inside the creep means that it has started collecting energy from the source.
爬行器内部冒出的黄色气泡意味着它已开始从源头收集能量。
To make the creep transfer energy back to the spawn, you need to use the method Creep.transfer. However, remember that it should be done when the creep is next to the spawn, so the creep needs to walk back.
If you modify the code by adding the check .store.getFreeCapacity() > 0 to the creep, it will be able to go back and forth on its own, giving energy to the spawn and returning to the source.
Extend the creep program so that it can transfer harvested energy to the spawn and return back to work.
要让蠕虫将能量传递回卵生地点,需要使用 Creep.transfer 方法。不过,请记住,这应该在蠕虫靠近产卵点时进行,因此蠕虫需要走回来。
如果修改代码,在蠕变程序中加入 .store.getFreeCapacity() > 0 复选框,它就能自己来回走动,向产卵者提供能量并返回源。
扩展蠕变程序,使其能够将收获的能量转移到产卵点,然后返回工作。

module.exports.loop = function () {
var creep = Game.creeps['Harvester1'];
// 蠕虫有空闲空间
if(creep.store.getFreeCapacity() > 0) {
var sources = creep.room.find(FIND_SOURCES);
if(creep.harvest(sources[0]) == ERR_NOT_IN_RANGE) {
creep.moveTo(sources[0]);
}
}
else {
//
if( creep.transfer(Game.spawns['Spawn1'], RESOURCE_ENERGY) == ERR_NOT_IN_RANGE ) {
creep.moveTo(Game.spawns['Spawn1']);
}
}
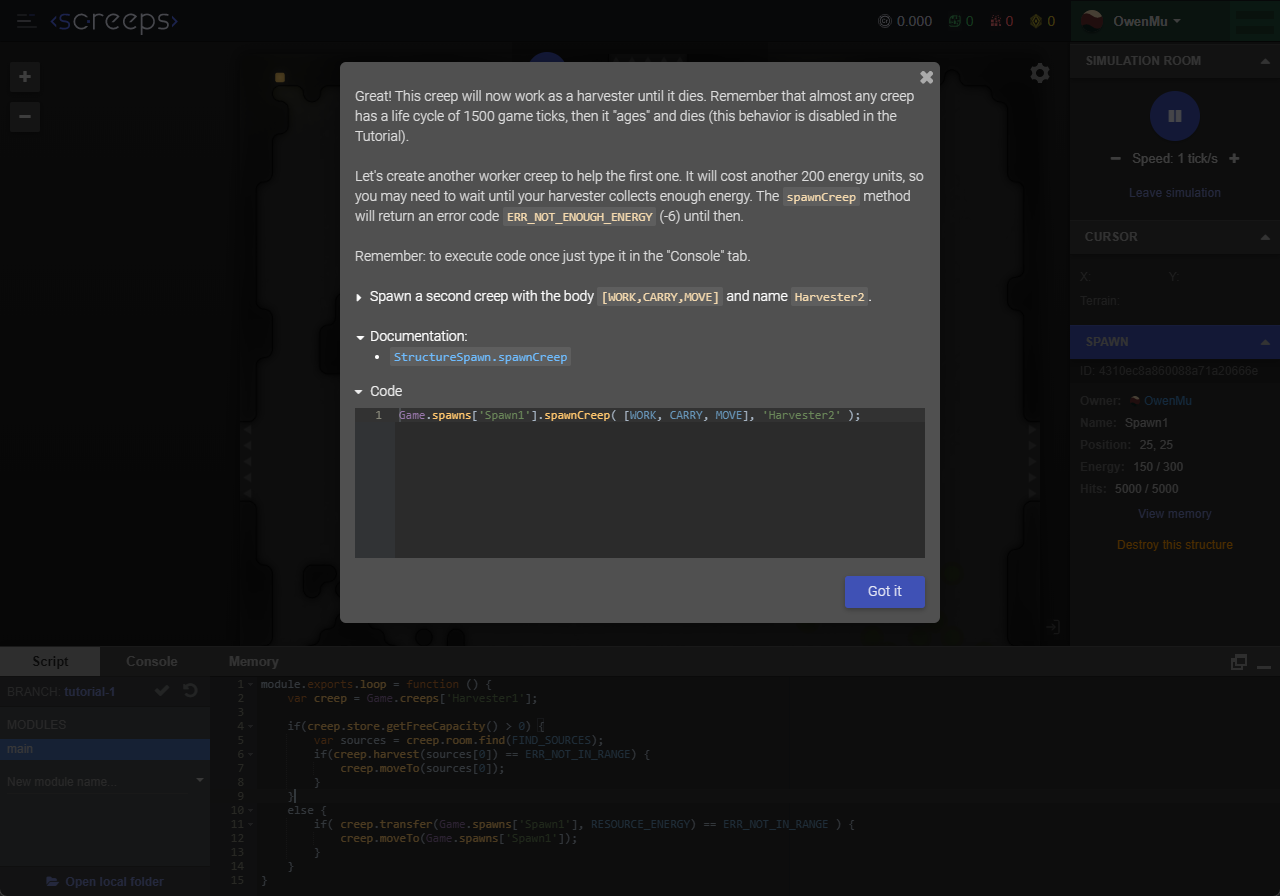
}Great! This creep will now work as a harvester until it dies. Remember that almost any creep has a life cycle of 1500 game ticks, then it "ages" and dies (this behavior is disabled in the Tutorial).
Let's create another worker creep to help the first one. It will cost another 200 energy units, so you may need to wait until your harvester collects enough energy. The spawnCreep method will return an error code ERR_NOT_ENOUGH_ENERGY (-6) until then.
Remember: to execute code once just type it in the "Console" tab.
Spawn a second creep with the body [WORK,CARRY,MOVE] and name Harvester2.
太好了 这只爬行者现在可以作为收割者工作,直到死亡。请记住,几乎所有蠕虫的生命周期都是 1500 个游戏时间,然后它就会 "衰老 "并死亡(教程中禁用了这一行为)。
让我们再创建一个工人蠕虫来帮助第一个蠕虫。这将另外耗费 200 个能量单位,所以你可能需要等到你的收割机收集到足够的能量。在此之前,creawnCreep 方法将返回错误代码ERR_NOT_ENOUGH_ENERGY (-6)。
记住:要执行一次代码,只需在 "控制台 "选项卡中输入即可。
生成第二个蠕虫,体型为 [WORK,CARRY,MOVE],名称为 Harvester2。
The second creep is ready, but it won't move until we include it into the program.
To set the behavior of both creeps we could just duplicate the entire script for the second one, but it's much better to use the for loop against all the screeps in Game.creeps.
Expand your program to both the creeps.
第二个蠕虫已经准备就绪,但在我们将其加入程序之前,它不会移动。
要设置两个蠕虫的行为,我们可以为第二个蠕虫复制整个脚本,但使用 for 循环来处理 Game.creeps 中的所有蠕虫要好得多。
将你的程序扩展到两个爬虫。
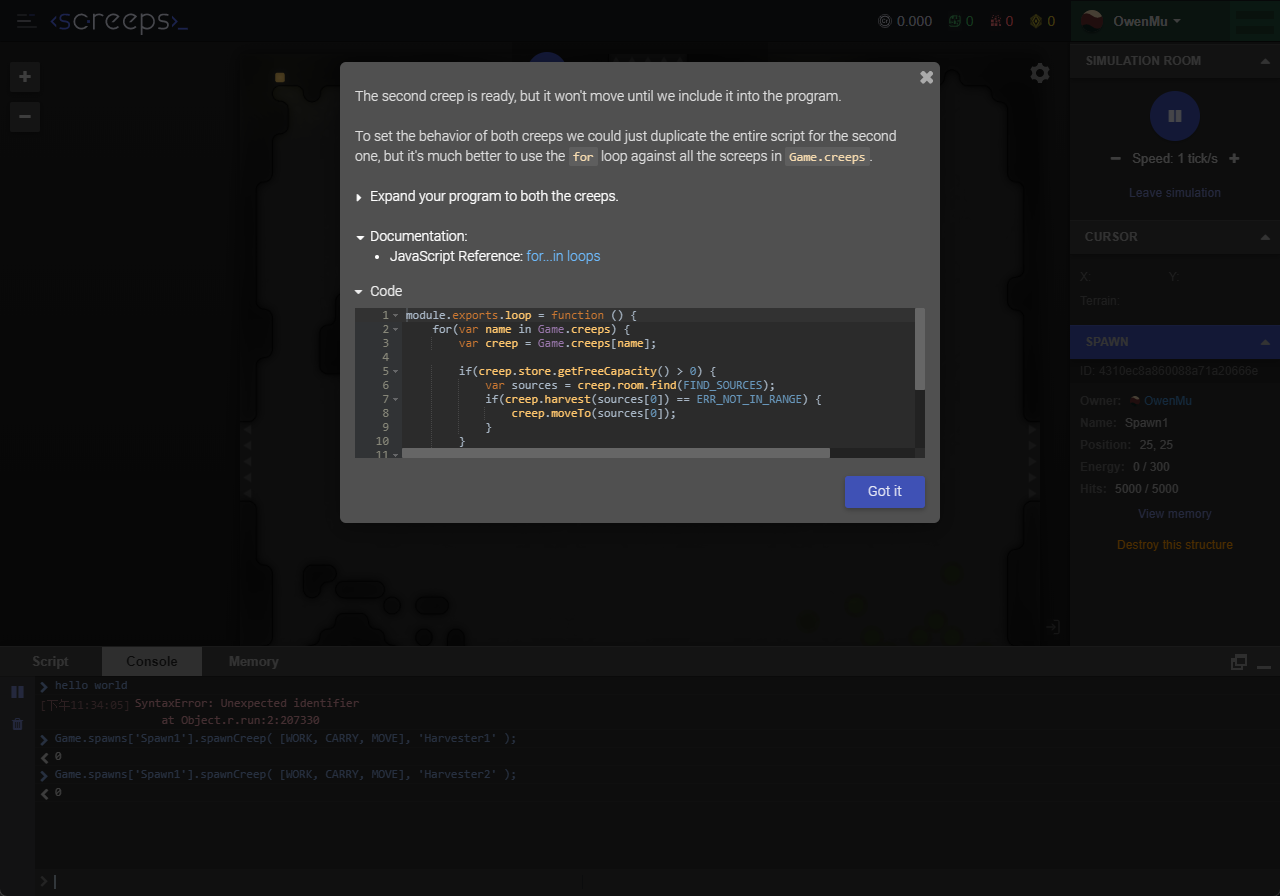
module.exports.loop = function () {
    for(var name in Game.creeps) {
        var creep = Game.creeps[name];

        if(creep.store.getFreeCapacity() > 0) {
            var sources = creep.room.find(FIND_SOURCES);
            if(creep.harvest(sources[0]) == ERR_NOT_IN_RANGE) {
                creep.moveTo(sources[0]);
            }
        }
        else {
            if(creep.transfer(Game.spawns['Spawn1'], RESOURCE_ENERGY) == ERR_NOT_IN_RANGE) {
                creep.moveTo(Game.spawns['Spawn1']);
            }
        }
    }
}
Now let's improve our code by taking the workers' behavior out into a separate module. Create a module called role.harvester with the help of the Modules section on the left of the script editor and define a run function inside the module.exports object, containing the creep behavior.
Create a role.harvester module.
现在,让我们改进代码,将工人的行为移到一个单独的模块中。借助脚本编辑器左侧的 MODULES 部分。创建一个名为 role.harvester 的模块,并在 module.exports 对象中定义一个运行函数,其中包含蠕变行为。
创建一个 role.harvester 模块。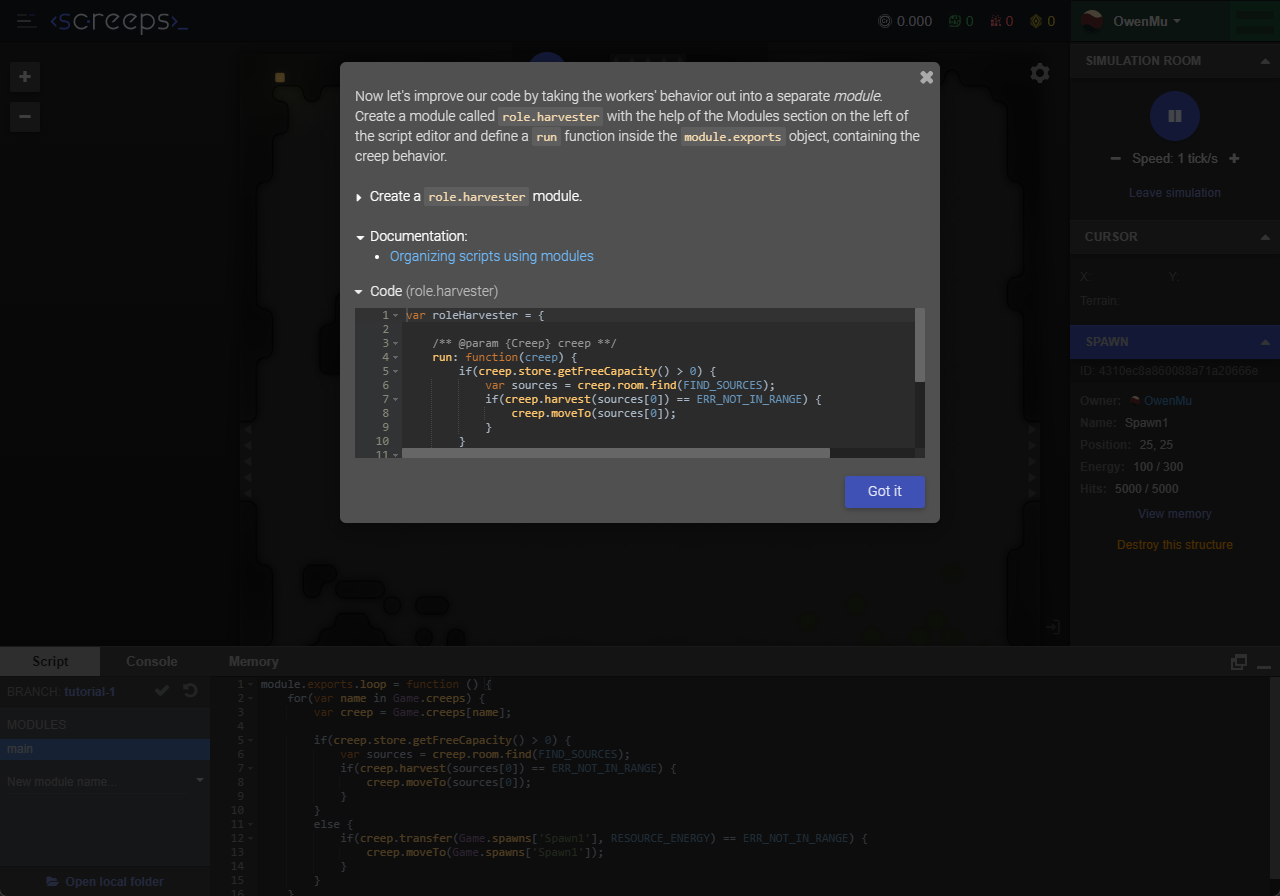
var roleHarvester = {

    /** @param {Creep} creep **/
    run: function(creep) {
	    if(creep.store.getFreeCapacity() > 0) {
            var sources = creep.room.find(FIND_SOURCES);
            if(creep.harvest(sources[0]) == ERR_NOT_IN_RANGE) {
                creep.moveTo(sources[0]);
            }
        }
        else {
            if(creep.transfer(Game.spawns['Spawn1'], RESOURCE_ENERGY) == ERR_NOT_IN_RANGE) {
                creep.moveTo(Game.spawns['Spawn1']);
            }
        }
	}
};

module.exports = roleHarvester;
Now you can rewrite the main module code, leaving only the loop and a call to your new module by the method require('role.harvester').
Include the role.harvester module in the main module.
现在你可以重写主模块代码,只留下循环和通过require('role.harvester')方法调用你的新模块。
在主模块中加入 role.harvester 模块。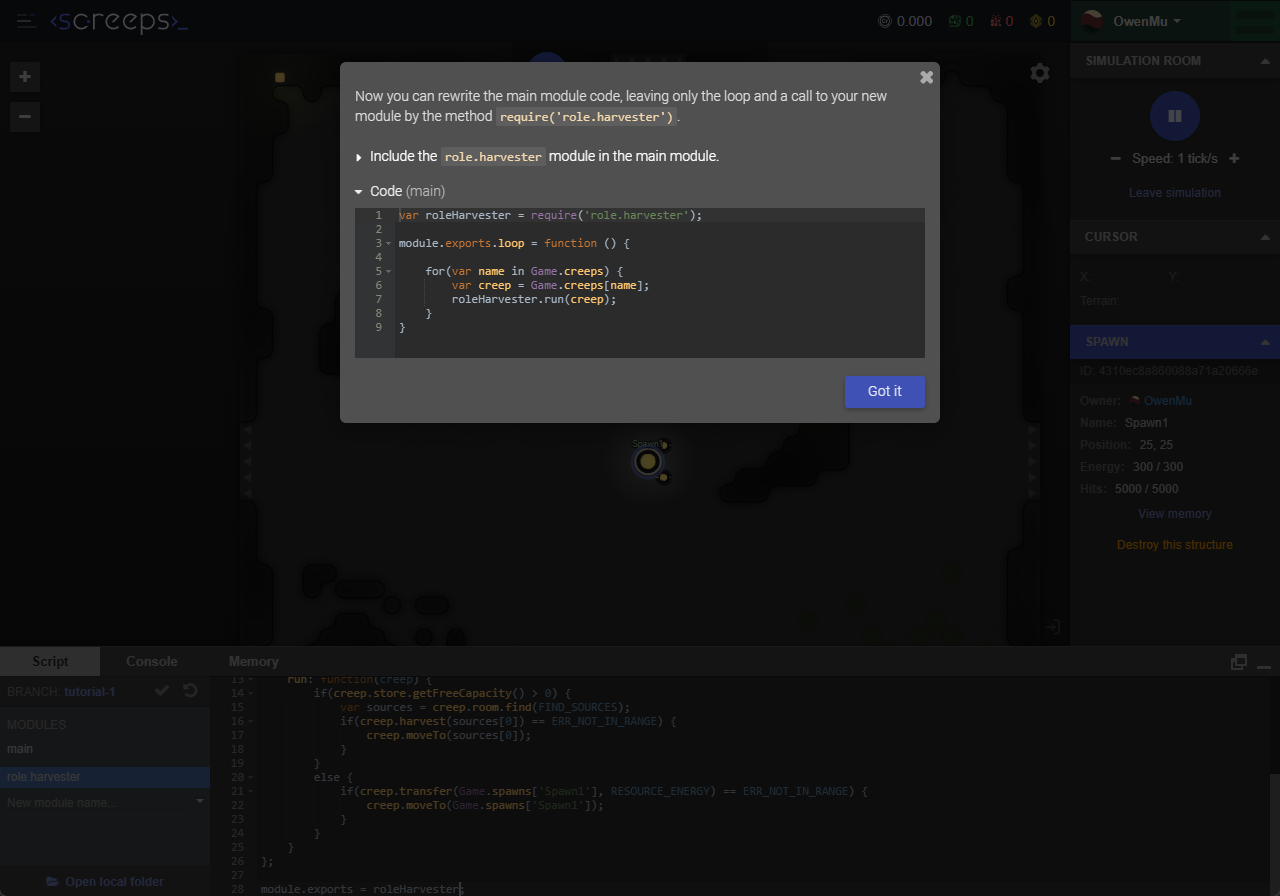
var roleHarvester = require('role.harvester');

module.exports.loop = function () {

    for(var name in Game.creeps) {
        var creep = Game.creeps[name];
        roleHarvester.run(creep);
    }
}
现在好多了!
通过这种方式为爬虫添加新角色和模块,你可以控制和管理许多爬虫的工作。在下一节教程中,我们将开发一个新的爬虫角色。
房间的操作
In this Tutorial section we’ll talk about a key strategic object in your room: Room Controller. By controlling this invincible structure you can build facilities in the room. The higher the controller level, the more structures available to build.
在本教程中,我们将讨论房间中的一个重要战略物件: 房间控制器。通过控制这个无敌结构,你可以在房间里建造设施。控制器等级越高,可建造的建筑就越多。
You will need a new worker creep to upgrade your controller level. Let's call it "Upgrader1". In following sections we'll discuss how to create creeps automatically, but for now let's send a command manually to the console.
Spawn a creep with the body [WORK,CARRY,MOVE] and the name Upgrader1.
您需要一个新的蠕虫来升级控制器级别。让我们称它为 "Upgrader1"。在接下来的章节中,我们将讨论如何自动创建蠕虫,但现在让我们手动向控制台发送一条命令。
生成一个体型为 [WORK,CARRY,MOVE]、名称为 Upgrader1 的蠕虫。
Game.spawns['Spawn1'].spawnCreep( [WORK, CARRY, MOVE], 'Upgrader1' );Creep "Upgrader1" went to perform the same task as the harvester, but we don't want it to. We need to differentiate creep roles.
蠕虫 "Upgrader 1 "去执行与收割机相同的任务,但我们并不希望它这样做。我们需要区分爬虫的角色。
To do that, we need to utilize the memory property of each creep that allows writing custom information into the creep's "memory". Let's do this to assign different roles to our creeps.
All your stored memory is accessible via the global Memory object. You can use it any way you like.
Write a property role='harvester' into the memory of the harvester creep and role='upgrader' — to the upgrader creep with the help of the console.
为此,我们需要利用每个小人的Memory属性,将自定义信息写入小人的Memory中。让我们来为爬虫分配不同的角色。
您可以通过全局 Memory"对象访问所有存储的内存。你可以随意使用它。
在控制台的帮助下,将role='harvester'的属性写入收割者爬虫的内存中,将role='upgrader'的属性写入升级者爬虫的内存中。
Game.creeps['Harvester1'].memory.role = 'harvester';
Game.creeps['Upgrader1'].memory.role = 'upgrader';
You can check your creeps' memory in either the creep information panel on the left or on the "Memory" tab.
Now let's define the behavior of the new creep. Both creeps should harvest energy, but the creep with the role harvester should bring it to the spawn, while the creep with the role upgrader should go to the Controller and apply the function upgradeController to it (you can get the Controller object with the help of the Creep.room.controller property).
In order to do this, we’ll create a new module called role.upgrader.
Create a new module role.upgrader with the behavior logic of your new creep.
您可以在左边的蠕虫信息面板或 "内存 "选项卡中查看蠕虫的内存。
现在我们来定义新蠕虫的行为。两只蠕虫都应收获能量,但拥有角色收获器的蠕虫应将能量带到产卵点,而拥有角色升级器的蠕虫应前往控制器并应用函数 upgradeController(可通过 Creep.room.controller 属性获取控制器对象)。
为此,我们将创建一个名为 role.upgrader 的新模块。
创建一个新模块 role.upgrader,其中包含新蠕虫的行为逻辑。
var roleUpgrader = {

    /** @param {Creep} creep **/
    run: function(creep) {
	    if(creep.store[RESOURCE_ENERGY] == 0) {
            var sources = creep.room.find(FIND_SOURCES);
            if(creep.harvest(sources[0]) == ERR_NOT_IN_RANGE) {
                creep.moveTo(sources[0]);
            }
        }
        else {
            if(creep.upgradeController(creep.room.controller) == ERR_NOT_IN_RANGE) {
                creep.moveTo(creep.room.controller);
            }
        }
	}
};

module.exports = roleUpgrader;
In our main module, all creeps run the same role. We need to divide their behavior depending on the previously defined property Creep.memory.role by connecting the new module.
Apply the logic from the module role.upgrader to the creep with the role upgrader and check how it performed.
在我们的主模块中,所有蠕虫都运行相同的角色。我们需要通过连接新模块,根据先前定义的属性 Creep.memory.role 来划分它们的行为。
将role.upgrader模块中的逻辑应用于角色为upgrader的蠕虫,并检查其执行情况。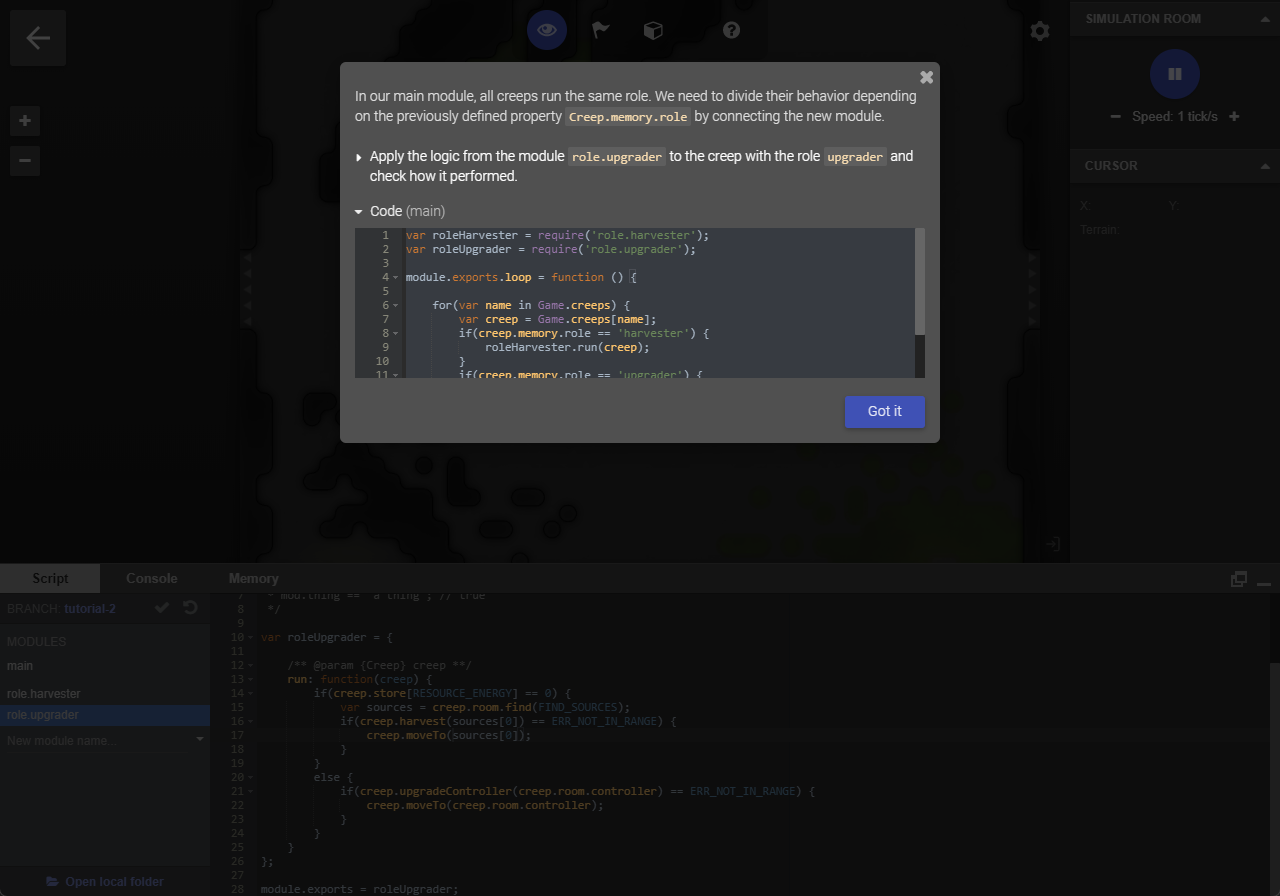
var roleHarvester = require('role.harvester');
var roleUpgrader = require('role.upgrader');

module.exports.loop = function () {

    for(var name in Game.creeps) {
        var creep = Game.creeps[name];
        if(creep.memory.role == 'harvester') {
            roleHarvester.run(creep);
        }
        if(creep.memory.role == 'upgrader') {
            roleUpgrader.run(creep);
        }
    }
}
Perfect, you have upgraded your Controller level!
Important: If you don’t upgrade your Controller within 20,000 game ticks, it loses one level. On reaching level 0, you will lose control over the room, and another player will be able to capture it freely. Make sure that at least one of your creeps regularly performs the function upgradeController.
完美,您已提升控制器等级!
重要提示: 如果您没有在 20,000 个游戏时间内升级控制器,它就会掉一级。达到 0 级时,您将失去对房间的控制权,其他玩家可以自由占领房间。确保至少有一个小兵定期执行 upgradeController 功能。
The Controller upgrade gives access to some new structures: walls, ramparts, and extensions. We’ll discuss walls and ramparts in the next Tutorial section, for now let’s talk about extensions.
Extensions are required to build larger creeps. A creep with only one body part of one type works poorly. Giving it several WORKs will make him work proportionally faster.
However, such a creep will be costly and a lone spawn can only contain 300 energy units. To build creeps costing over 300 energy units you need spawn extensions.
控制器升级后可以使用一些新结构:城墙、城垛和延伸部分。我们将在下一节教程中讨论城墙和城垛,现在让我们来谈谈扩展部分。
要建造更大的蠕虫,需要扩展。只有一种身体部位的蠕虫效果很差。赋予它多个 "工作 "会使它的工作速度成比例地提高。
然而,这样的蠕虫成本很高,而且一个单独的产卵只能包含 300 个能量单位。如果要建造超过 300 能量单位的蠕虫,就需要对产卵进行扩展。
The second Controller level has 5 extensions available for you to build. This number increases with each new level.
You can place extensions at any spot in your room, and a spawn can use them regardless of the distance. In this Tutorial we have already placed corresponding construction sites for your convenience.
第二个控制器级别有5个扩展供您建造。每个新关卡的数量都会增加。
您可以在房间的任意位置放置扩展装置,而且无论距离多远,都可以使用它们。在本教程中,我们已经放置了相应的建筑工地,以方便您的使用。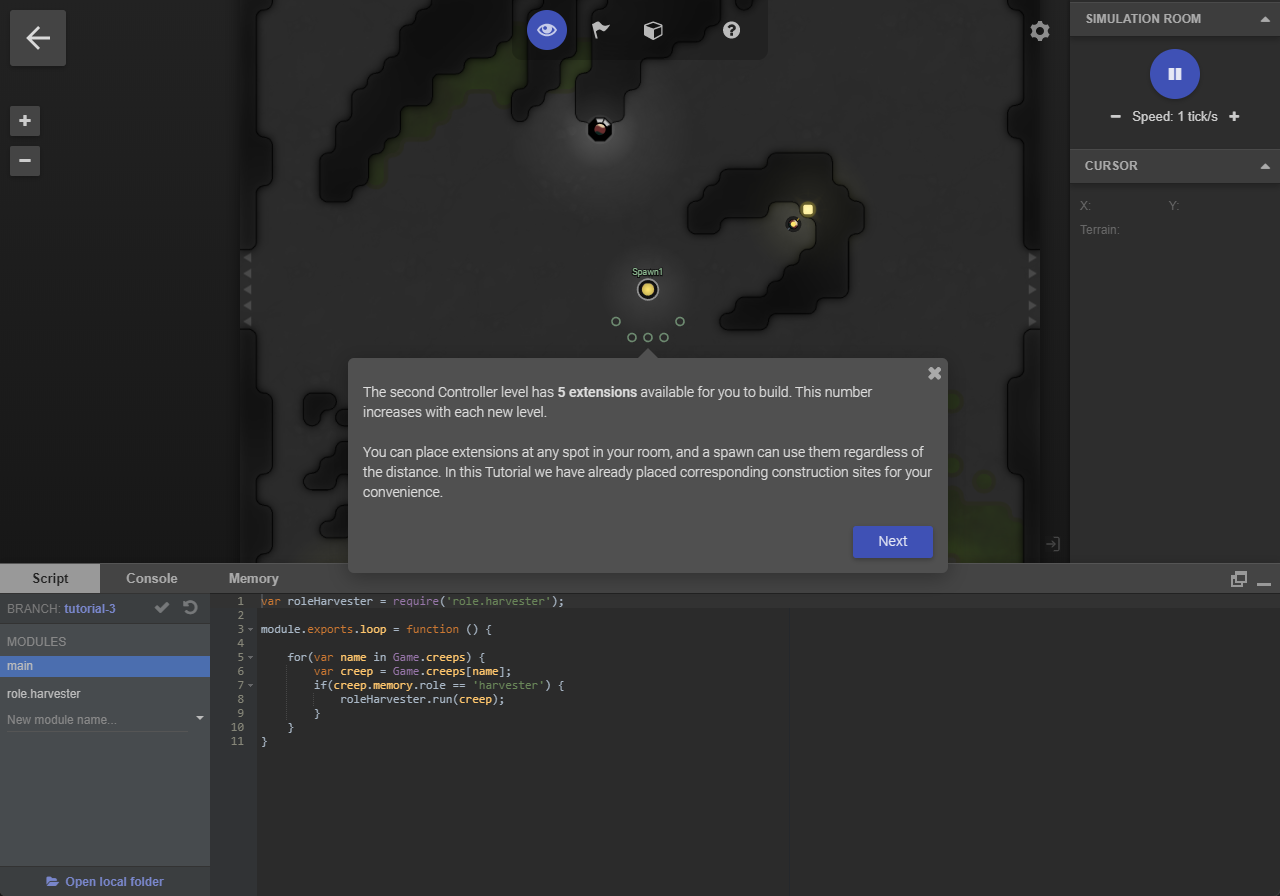
Let’s create a new creep whose purpose is to build structures. This process will be similar to the previous Tutorial sections. But this time let’s set memory for the new creep right in the method Spawn.spawnCreep by passing it in the third argument.
Spawn a creep with the body [WORK,CARRY,MOVE], the name Builder1, and {role:'builder'} as its memory.
让我们创建一个新的蠕变,其目的是构建结构。这个过程与之前的教程部分类似。但这次我们要在方法 Spawn.spawnCreep 中为新蠕虫设置内存,将其作为第三个参数。
生成一个主体为 [工作,携带,移动]、名称为 Builder1 和内存为 {role:'builder'} 的蠕虫。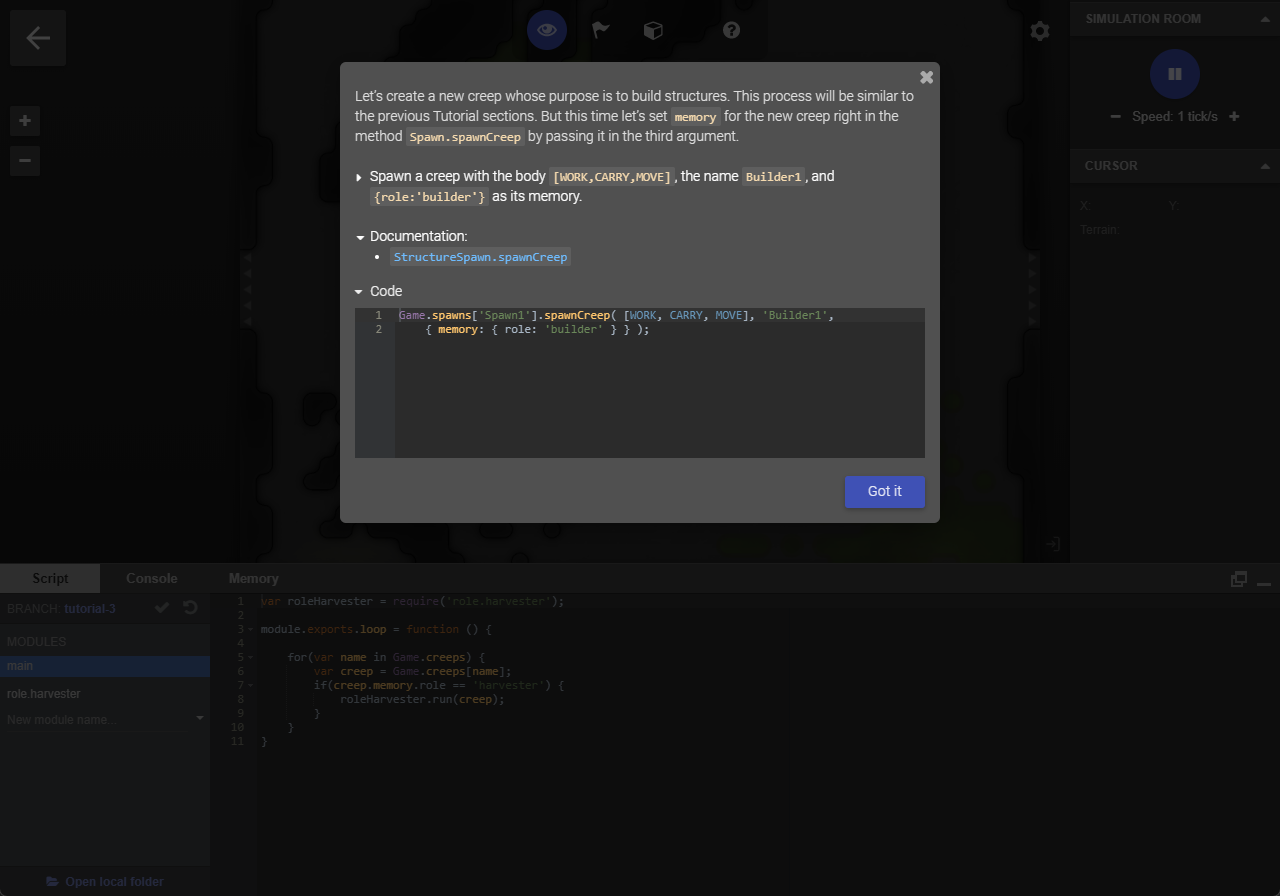
Our new creep won’t move until we define the behavior for the role builder.
在定义角色 builder 的行为之前,我们的新蠕变不会移动。
var roleBuilder = {

    /** @param {Creep} creep **/
    run: function(creep) {

	    if(creep.memory.building && creep.store[RESOURCE_ENERGY] == 0) {
            creep.memory.building = false;
            creep.say('🔄 harvest');
	    }
	    if(!creep.memory.building && creep.store.getFreeCapacity() == 0) {
	        creep.memory.building = true;
	        creep.say('🚧 build');
	    }

	    if(creep.memory.building) {
	        var targets = creep.room.find(FIND_CONSTRUCTION_SITES);
            if(targets.length) {
                if(creep.build(targets[0]) == ERR_NOT_IN_RANGE) {
                    creep.moveTo(targets[0], {visualizePathStyle: {stroke: '#ffffff'}});
                }
            }
	    }
	    else {
	        var sources = creep.room.find(FIND_SOURCES);
            if(creep.harvest(sources[0]) == ERR_NOT_IN_RANGE) {
                creep.moveTo(sources[0], {visualizePathStyle: {stroke: '#ffaa00'}});
            }
	    }
	}
};

module.exports = roleBuilder;
var roleHarvester = require('role.harvester');
var roleBuilder = require('role.builder');
module.exports.loop = function () {
for(var name in Game.creeps) {
var creep = Game.creeps[name];
if(creep.memory.role == 'harvester') {
roleHarvester.run(creep);
}
if(creep.memory.role == 'builder') {
roleBuilder.run(creep);
}
}
}要维持扩展设施,您需要教导收割者不仅将能量输送到生成点,还要将其输送到扩展设施中。为此,您可以使用 Game.structures 对象,或者借助 Room.find(FIND_STRUCTURES) 在房间内进行搜索。无论哪种方式,您都需要对物品列表进行筛选,条件为结构的结构类型 == 结构扩展(或者,也可以是结构 instanceof StructureExtension),同时还要检查它们的能量负载情况,就像之前那样。
var roleHarvester = {

    /** @param {Creep} creep **/
    run: function(creep) {
	    if(creep.store.getFreeCapacity() > 0) {
            var sources = creep.room.find(FIND_SOURCES);
            if(creep.harvest(sources[0]) == ERR_NOT_IN_RANGE) {
                creep.moveTo(sources[0], {visualizePathStyle: {stroke: '#ffaa00'}});
            }
        }
        else {
            var targets = creep.room.find(FIND_STRUCTURES, {
                    filter: (structure) => {
                        return (structure.structureType == STRUCTURE_EXTENSION || structure.structureType == STRUCTURE_SPAWN) &&
                            structure.store.getFreeCapacity(RESOURCE_ENERGY) > 0;
                    }
            });
            if(targets.length > 0) {
                if(creep.transfer(targets[0], RESOURCE_ENERGY) == ERR_NOT_IN_RANGE) {
                    creep.moveTo(targets[0], {visualizePathStyle: {stroke: '#ffffff'}});
                }
            }
        }
	}
};

module.exports = roleHarvester;
要了解房间内的总能量值,您可以使用“Room.energyAvailable”这个属性。让我们将该属性的输出值添加到控制台中,以便在扩展填充过程中对其进行跟踪。
var roleHarvester = require('role.harvester');
var roleBuilder = require('role.builder');

module.exports.loop = function () {

    for(var name in Game.rooms) {
        console.log('Room "'+name+'" has '+Game.rooms[name].energyAvailable+' energy');
    }

    for(var name in Game.creeps) {
        var creep = Game.creeps[name];
        if(creep.memory.role == 'harvester') {
            roleHarvester.run(creep);
        }
        if(creep.memory.role == 'builder') {
            roleBuilder.run(creep);
        }
    }
}
Excellent, all the structures are filled with energy. It’s time to build somebody large!
总的来说,我们在起始位置和扩展区域共有 550 个能量单位。这些能量足够建造一个拥有以下动作的单位:[工作,工作,工作,工作,搬运,移动,移动]。这个单位的工作速度将比普通的工兵单位快 4 倍。它的身体较重,所以我们还需要再增加一个“移动”动作。然而,仍有两个部分不足以使其以小型快速单位的速度移动,这需要 4 个“移动”动作或者建造一条道路。
建造这个怪物耗费了所有能量储备,使其全部耗尽。现在让我们选择我们的“怪物”并观察它如何运作。
因此,通过升级你的控制器、构建新的扩展以及配备更强大的兵种,你能够显著提高你的殖民地工作的效率。此外,通过用较少数量的大兵来替换大量小兵,你可以节省用于控制这些兵种的 CPU 资源,这是在在线模式中进行游戏的重要前提条件。
在接下来的部分,我们将探讨如何设置自动生产新蠕虫的过程。
Auto-spawning creeps
到目前为止,我们都是直接在控制台中创建新的怪物。但持续这样做并不是个好主意,因为“Screeps”的核心理念是让你的殖民地能够自我管理。如果你能让你的产卵点自行在房间内生成怪物,那将会是很好的做法。
这是一个相当复杂的话题,许多玩家会花费数月的时间来完善和优化他们的自动生成代码。但让我们至少尝试一些简单的内容,并先掌握一些基本原理来开始吧。
当旧的怪物因年龄增长或其他原因死亡时,您需要创建新的怪物。由于游戏中没有专门的事件来记录特定怪物的死亡情况,所以最简单的方法就是计算所需的怪物数量,如果数量少于设定的值,就启动生成过程。
有几种方法可以统计所需类型怪物的数量。其中一种方法是借助 _.filter 函数对 Game.creeps 进行筛选,并利用它们内存中的角色信息。让我们尝试这样做,并将怪物的数量显示在控制台中。
var roleHarvester = require('role.harvester');
var roleUpgrader = require('role.upgrader');

module.exports.loop = function () {

    var harvesters = _.filter(Game.creeps, (creep) => creep.memory.role == 'harvester');
    console.log('Harvesters: ' + harvesters.length);

    for(var name in Game.creeps) {
        var creep = Game.creeps[name];
        if(creep.memory.role == 'harvester') {
            roleHarvester.run(creep);
        }
        if(creep.memory.role == 'upgrader') {
            roleUpgrader.run(creep);
        }
    }
}
假设我们希望任何时候都至少有两名收割者。实现这一目标最简单的方法是:每次发现数量少于这个数值时,就调用 StructureSpawn.spawnCreep 这个函数。您不必定义其名称(在这种情况下它会自动赋值),但请务必定义所需的角色。
我们还可以添加一些新的 RoomVisual 调用语句,以便直观地展示正在生成的怪物类型。
var roleHarvester = require('role.harvester');
var roleUpgrader = require('role.upgrader');

module.exports.loop = function () {

    var harvesters = _.filter(Game.creeps, (creep) => creep.memory.role == 'harvester');
    console.log('Harvesters: ' + harvesters.length);

    if(harvesters.length < 2) {
        var newName = 'Harvester' + Game.time;
        console.log('Spawning new harvester: ' + newName);
        Game.spawns['Spawn1'].spawnCreep([WORK,CARRY,MOVE], newName,
            {memory: {role: 'harvester'}});
    }

    if(Game.spawns['Spawn1'].spawning) {
        var spawningCreep = Game.creeps[Game.spawns['Spawn1'].spawning.name];
        Game.spawns['Spawn1'].room.visual.text(
            '🛠️' + spawningCreep.memory.role,
            Game.spawns['Spawn1'].pos.x + 1,
            Game.spawns['Spawn1'].pos.y,
            {align: 'left', opacity: 0.8});
    }

    for(var name in Game.creeps) {
        var creep = Game.creeps[name];
        if(creep.memory.role == 'harvester') {
            roleHarvester.run(creep);
        }
        if(creep.memory.role == 'upgrader') {
            roleUpgrader.run(creep);
        }
    }
}
Now let’s try to emulate a situation when one of our harvesters dies. You can now give the command suicide to the creep via the console or its properties panel on the right.
现在让我们来模拟一下我们的收割者之一死亡的情况。现在,您可以通过控制台或右侧的属性面板向该角色下达“自杀”指令。 Game.creeps['Harvester1'].suicide()
从控制台中您可以看到,当我们缺少一台收割机后,该机器立即开始建造一台新的收割机,并且给它起了一个新的名字。
这里有一个重要的点需要强调:死亡生物的记忆并不会被抹去,而是会被保留下来以便日后再次使用。如果每次创建生物时都使用随机的名字,可能会导致内存溢出,所以应该在每次更新(即在创建生物的代码之前)时将其清除。
var roleHarvester = require('role.harvester');
var roleUpgrader = require('role.upgrader');

module.exports.loop = function () {

    for(var name in Memory.creeps) {
        if(!Game.creeps[name]) {
            delete Memory.creeps[name];
            console.log('Clearing non-existing creep memory:', name);
        }
    }

    var harvesters = _.filter(Game.creeps, (creep) => creep.memory.role == 'harvester');
    console.log('Harvesters: ' + harvesters.length);

    if(harvesters.length < 2) {
        var newName = 'Harvester' + Game.time;
        console.log('Spawning new harvester: ' + newName);
        Game.spawns['Spawn1'].spawnCreep([WORK,CARRY,MOVE], newName,
            {memory: {role: 'harvester'}});
    }

    if(Game.spawns['Spawn1'].spawning) {
        var spawningCreep = Game.creeps[Game.spawns['Spawn1'].spawning.name];
        Game.spawns['Spawn1'].room.visual.text(
            '🛠️' + spawningCreep.memory.role,
            Game.spawns['Spawn1'].pos.x + 1,
            Game.spawns['Spawn1'].pos.y,
            {align: 'left', opacity: 0.8});
    }

    for(var name in Game.creeps) {
        var creep = Game.creeps[name];
        if(creep.memory.role == 'harvester') {
            roleHarvester.run(creep);
        }
        if(creep.memory.role == 'upgrader') {
            roleUpgrader.run(creep);
        }
    }
}
如今,逝者的记忆被遗忘,这为我们节省了资源。
除了在老怪物死亡后生成新的怪物之外,还有另一种保持所需怪物数量的方法:使用StructureSpawn.renewCreep方法。在教程中,怪物老化功能已被禁用,所以我们建议您自行熟悉一下这个方法。
保卫你的房间
在“斯雷普”世界里,并非处处都安全。其他玩家可能会侵占你的领地。此外,你的房间还可能偶尔遭到中立的非玩家角色小怪的入侵。因此,你应当考虑如何加强你的殖民地防御,以便成功地发展它。
这个敌对的怪物是从左侧入口进入并攻击了你们的殖民地的。幸好我们有围墙可以暂时限制它的行动。但它们迟早还是会破墙而出的,所以我们得想办法解决这个问题。
避免遭遇攻击的最可靠方法就是使用房间的“安全模式”。在安全模式下,房间内的任何其他怪物都无法使用任何有害手段(但您仍能够抵御外来的入侵者)。
安全模式是通过房间控制器来激活的,该控制器应具备可供使用的激活功能。让我们用一个激活码来在我们的房间里开启这个模式。
Game.spawns['Spawn1'].room.controller.activateSafeMode();如您所见,敌人的潜行者停止了攻击城墙——其有害手段已被阻断。我们建议当您的防御措施失效时,您应启用安全模式。
现在让我们把房间里的不速之客清理出去吧。
塔是有效保卫房间的最简单方式。它们消耗能量,并且可以针对房间内的任何单位进行攻击或治疗。其效果取决于塔与目标之间的距离。
首先,让我们为新塔楼搭建基础。您可以选择任何您想要的位置(在围墙内均可),然后通过上部面板上的“建造”按钮将施工地点定位在那里。
Game.spawns['Spawn1'].room.createConstructionSite( 23, 22, STRUCTURE_TOWER );“爬行者建造者 1 号”已经立即开始施工了。咱们就等着它完工吧。
塔会消耗能量,所以让我们将采集者的角色设定为同时为塔以及其他建筑提供能量。要做到这一点,您需要将“结构塔”这一常量添加到您的采集器所瞄准的结构的筛选条件中。
var roleHarvester = {

    /** @param {Creep} creep **/
    run: function(creep) {
	    if(creep.store.getFreeCapacity() > 0) {
            var sources = creep.room.find(FIND_SOURCES);
            if(creep.harvest(sources[0]) == ERR_NOT_IN_RANGE) {
                creep.moveTo(sources[0], {visualizePathStyle: {stroke: '#ffaa00'}});
            }
        }
        else {
            var targets = creep.room.find(FIND_STRUCTURES, {
                    filter: (structure) => {
                        return (structure.structureType == STRUCTURE_EXTENSION ||
                                structure.structureType == STRUCTURE_SPAWN ||
                                structure.structureType == STRUCTURE_TOWER) &&
                                structure.store.getFreeCapacity(RESOURCE_ENERGY) > 0;
                    }
            });
            if(targets.length > 0) {
                if(creep.transfer(targets[0], RESOURCE_ENERGY) == ERR_NOT_IN_RANGE) {
                    creep.moveTo(targets[0], {visualizePathStyle: {stroke: '#ffffff'}});
                }
            }
        }
	}
};

module.exports = roleHarvester;
太好了,您的塔楼已准备就绪,可以投入使用了!
就像一个“怪物”一样,塔有几种类似的功能:攻击、治疗和修复。每种操作都需要消耗 10 个能量单位。一旦发现敌方的“怪物”,我们就需要对其使用攻击技能。要记住,距离至关重要:同样的能量消耗下,效果可能会强上好几倍!
要直接获取塔对象,您可以从右侧面板中获取其 ID,并使用 Game.getObjectById 方法。
var roleHarvester = require('role.harvester');
var roleUpgrader = require('role.upgrader');
var roleBuilder = require('role.builder');

module.exports.loop = function () {

    var tower = Game.getObjectById('560d2205c274522700e9ad9b');
    if(tower) {
        var closestHostile = tower.pos.findClosestByRange(FIND_HOSTILE_CREEPS);
        if(closestHostile) {
            tower.attack(closestHostile);
        }
    }

    for(var name in Game.creeps) {
        var creep = Game.creeps[name];
        if(creep.memory.role == 'harvester') {
            roleHarvester.run(creep);
        }
        if(creep.memory.role == 'upgrader') {
            roleUpgrader.run(creep);
        }
        if(creep.memory.role == 'builder') {
            roleBuilder.run(creep);
        }
    }
}
敌人的潜行者已被消灭,我们的殖民地可以松一口气了。不过,在这次短暂的攻击中,入侵者损坏了一些围墙。你最好开启自动修复功能。
受损的建筑可以通过裂缝修复法和塔式修复法进行修复。我们不妨尝试使用塔式修复法来处理这个问题。我们将需要用到修复方法。您还需要 Room.find 方法以及一个过滤器来定位受损的墙壁。
请注意,由于墙壁不属于任何玩家所有,所以要找到它们需要使用“FIND_STRUCTURES”指令,而不是“FIND_MY_STRUCTURES”指令。
var roleHarvester = require('role.harvester');
var roleUpgrader = require('role.upgrader');
var roleBuilder = require('role.builder');

module.exports.loop = function () {

    var tower = Game.getObjectById('560d2205c274522700e9ad9b');
    if(tower) {
        var closestDamagedStructure = tower.pos.findClosestByRange(FIND_STRUCTURES, {
            filter: (structure) => structure.hits < structure.hitsMax
        });
        if(closestDamagedStructure) {
            tower.repair(closestDamagedStructure);
        }

        var closestHostile = tower.pos.findClosestByRange(FIND_HOSTILE_CREEPS);
        if(closestHostile) {
            tower.attack(closestHostile);
        }
    }

    for(var name in Game.creeps) {
        var creep = Game.creeps[name];
        if(creep.memory.role == 'harvester') {
            roleHarvester.run(creep);
        }
        if(creep.memory.role == 'upgrader') {
            roleUpgrader.run(creep);
        }
        if(creep.memory.role == 'builder') {
            roleBuilder.run(creep);
        }
    }
}
此次袭击造成的所有损失都已得到修复!
恭喜,您已完成教程!现在您已经掌握了足够的知识和代码,可以开始在在线模式中进行游戏了。选择您的房间,建立一个殖民地,然后踏上您在《Screeps》世界中称霸的征程吧!
如果您想更深入地探究游戏的细节之处或者有任何疑问,请随时查阅以下内容:
Have fun scripting!